Showing posts with label 73. Show all posts

Audi S90 100 1970 73 Brake Repair Guide

| 0 comments |
Models Covered
  • S90 (1970-72)
  • 100 (1970-73)


DESCRIPTION
Brake system is hydraulically operated, utilizing a tandem master cylinder and Teves T 51/349 power brake unit. Front disc brakes consist of rotors attached to transmission output flanges, and two-piston calipers attached to transmission. Disc pads are equipped with a ceramic transmitter-type wear sensor. Transmitter is mounted on cross spring and will break when contact is made with pad plates, interrupting control circuit and causing indicator light on instrument panel to be activate. Rear brakes are leading-trailing shoe/drum type, using a dual piston wheel cylinder. Parking brake is cable actuated, operating secondary shoes of rear brake assemblies.
ADJUSTMENT
NOTE - Adjustments or readjustments should be carrier out on cold brakes. However, brakes must be warm when testing. Instrument panel trim must be removed to adjust master cylinder push rod free play.
MASTER CYLINDER PUSH ROD FREE PLAY
Check brake pedal free play by measuring distance between master cylinder push rod and master cylinder piston. This measurement should be .039" (1.0 mm), which would give free play of .20" (5.08 mm) at brake pedal. If necessary to adjust, loosen lock nut on push rod and turn push rod until correct clearance is obtained. Tighten lock nut and again measure pedal free play at brake pedal.
FRONT DISC BRAKES
Front disc brakes are self-adjusting, therefore, no adjustment in service is required.
REAR DRUM BRAKES
Raise and support rear of vehicle release parking brake. Using a 17 mm wrench, tighten eccentric adjusters until wheels can no longer be turned by hand. Loosen eccentric adjusters until wheels are just free to turn.
PARKING BRAKE
Raise and support rear of vehicle and adjust rear brakes. Lift parking brake lever until it engages third ratchet stop. Adjust nut at equalizer until rear wheels are just free to turn. When parking brake lever is pulled up one additional notch (to fourth ratchet stop), rear wheels should be locked.
HYDRAULIC SYSTEM BLEEDING
Fill master cylinder reservoir with brake fluid and maintain level throughout bleeding operation. Attach a hose to bleeder screw, and immerse opposite end in a container partially full of brake fluid. Open bleeder screw approximately one-half turn, depress brake pedal, close bleeder screw, and slowly return pedal. Continu operation until air bubbles are no longer seen in discharge fluid. Bleeding sequence is left-rear, right-rear, right-front, left-front.
REMOVAL & INSTALLATION
FRONT DISC BRAKE PADS
Removal - Remove lock clips. Pull out retaining pins so they project into openings in side members. NOTE - Do not remove rubber grommets from side member holes. Using a suitable extractor tool (SB-3), remove disc pads from caliper.
NOTE - Disc pads can be removed on right side only after removing front exhaust pipe.
Installation - Press both pistons into caliper bores.
NOTE - Fluid level in master cylinder reservoir will rise.
Siphon sufficient fluid to prevent reservoir from overflowing. Ensure pistons are in correct alignment in bores using suitable tool (B-5). Install disc pads in recesses of caliper, slide in retaining pins, and install lock clip. Pump brake pedal several times to position disc pads. Bleed hydraulic system if necessary.
FRONT DISC BRAKE CALIPER & ROTOR
Removal - 1) On vehicles equipped with automatic transmission, disconnect steering damper from its bracket and move out of way. On all models, depress brake pedal approximately 1.2" (30.48 mm) and hold in this position by using suitable pedal support. Disconnect temperature transmitter wire from connector (near transmission)
2) On automatic transmission equipped vehicles, disconnect hydraulic line at union on transmission, EGR line at exhaust pipe, and exhaust pipe from hangers. On all models, disconnect and remove front exhaust pipe and shield from manifold, and drive shaft at stub axle.
3) Remove ball joint mounting bolts, pull wheel downward, and swing out steering knuckle after prying it off ball joint. Remove disc brake pads, leaving spring and wire in vehicle. Remove EGR filter from oil  pan. Remove caliper mounting nuts, then remove caliper and rotor from stub axle. NOTE - If necessary, pry engine assembly to one side to ease removal.
Installation - To install, reverse removal procedure, tighten caliper mounting bolts securely, and bleed hydraulic system.
REAR BRAKE DRUM
REAR BRAKE ASSEMBLY
Removal - Raise and support vehicle, remove wheel and tire assembly. Pry off dust cap, remove cotter pin from hex nut, and remove nut. Remove brake drum making sure that retaining washer and wheel bearing do not fall out.
Installation - To install, reverse removal procedure adjust brakes, and adjust wheel bearings. See Wheel Bearing Adjustment in WHEEL ALIGNMENT Section.
REAR BRAKE SHOES
Removal - With brake drum removed, remove retaining spring for brake shoes. Remove shoes as an assembly by disconnecting spring at bottom, pulling shoes back from wheel cylinder, and disconnecting parking brake cable.
Installation - To install, reverse removal procedure and not the following: Make sure long ends of retainin clip and spring are installed on secondary shoe and parking brake lever. Ensure brake shoes are correctly positioned on wheel cylinder pistons.
REAR BRAKE WHEEL CYLINDER
Removal - With drum and shoes removed, depress brake pedal approximately 1.4" (35.56 mm) and hold in this position by using suitable pedal support. Disconnect remaining hydraulic line and cylinder mounting nuts. Separate master cylinder from power unit, taking care not to lose "O" ring installed between units.
Installation - To install, reverse removal procedure, adjust brakes and bleed hydraulic system.
MASTER CYLINDER
Removal - Disconnect hydraulic line at rear of master cylinder. Depress brake pedal 1.2-1.6" and hold in position using a suitable pedal support. Disconnect remaining hydraulic line and cylinder mounting nuts. Separate master cylinder from power unit taking care not to lose "O" ring installed between them.
Installation - To install, reverse removal procedure and bleed hydraulic system.
POWER BRAKE UNIT
Removal - Siphon brake fluid from master cylinder reservoir and disconnect hydraulic lines. Loosen hose clamp and disconnect vacuum hose from power unit. From inside vehicle, remove trim below instrument panel as necessary. Disconnect push rod form brake pedal, remove power unit adapter attaching nuts, and remove power unit and master cylinder from engine compartment as an assembly. Separate master cylinder and adaptor from power unit.
Installation - To install, reverse removal procedure and note the following: Be sure to install "O" ring between master cylinder and power unit. Install adaptor to power unit so that center punch mark on adaptor is located on lower right hand side facing engine. To complete installation, adjust pedal push rod free play and bleed hydraulic system.
Check Valve Replacement - A vacuum check valve is locate in vacuum line between intake manifold and power it. To remove, loosen hose clamps, separate vacuum hoses from check valve, and remove check valve. To install, reverse removal procedure and not the following: Check valve is stamped with the word "MOTOR" and an arrow. End of valve in which arrow points must be connect to shorter hose from intake manifold.
OVERHAUL
FRONT DISC BRAKE CALIPER
FRONT DISC BRAKE CALIPER ASSEMBLY
Disassembly - Remove disc pads. Pry out retaining ring and remove dust seal by hand. Place a small block of wood in caliper cavity, and remove piston by applying compressed air to fluid inlet. Remove remaining piston in same manner. Remove seal from caliper bore using a piece of wood or plastic. NOTE - Do not use hard or sharp tools for this purpose. Do not separate caliper halves.
FRONT DISC BRAKE CALIPER ASSEMBLY
Cleaning & Inspection - Clean all parts in alcohol only. Check cylinder bore and piston for damage. NOTE - Do not machine caliper bore or piston. Parts are serviced by replacement only.
PINION INSTALLATION
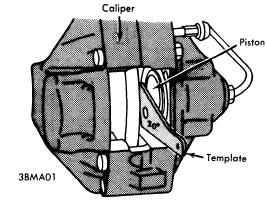
Reassembly - Coat all parts with ATE brake cylinder paste (or equivalent), reverse  disassembly procedure, and note the following: Use new seals, dust boots, and retaining rings when reassembling. When installing piston, make sure machined surface of piston face makes a 20° angle to wall of caliper bore (see illustration). Install disc pads after caliper has been installed on vehicle.
REAR WHEEL CYLINDER
Disassembly - Thoroughly clean outside of cylinder. Remove end caps, piston and seal assemblies, and spring. Remove dust cap and bleeder screw.
AUDI MASTER CYLINDER
(COMPONENT PARTS)
Cleaning & Inspection - Clean all parts in alcohol only. Check all parts for rust, corrosion, and damage. Check cylinder bore and piston for wear or damage. Cylinder bore should not exceed .6287" (16.00 mm) and piston diameter should not be less than .619" (15.74 mm). NOTE - Manufacturer recommends replacing rubber components on each disassembly.
Reassembly - Reverse disassembly procedure and not the following: Apply a thin coat of ATE brake cylinder paste (or equivalent) to all parts during assembly.
MASTER CYLINDER
Disassembly - Remove reservoir, brake light switch, circlip and dismantle cylinder. To extract piston, unscrew stop screw.
Cleaning & Inspecting - Clean all parts in denatured alcohol. Inspect bore and piston for rust or wear and replace any parts out of tolerance. It is advisable to always replace rubber parts.
Reassembly - Preassemble pistons and coat cups with ATE brake cylinder paste (or equivalent). Insert assembly into cylinder bore, install stop screw and circlip. Install brake light switch and resrevoir.
NOTE - Models without power brake servo differ slightly. Primary piston desgin is somewhat varied. Piston is equipped with only on secondary boot. There is no air compensating bore. Brake light switch location is different.


Read More..

BMW 1969 73 6 Cylinder Models Brake Repair Manual

| 0 comments |
Models Covered

  • 2500 (1969-70)
  • 2800 (1969-70)
  • 2800 CS & CSA (1969-71)
  • 3.0 CS & CSA (1969-71)
  • Bavaria (1972-73)


DESCRIPTION
Models 2800 CS and CSA use ATE four-piston fixed caliper disc brakes on front and leading-trailing shoe drum brake on the rear. All other models use four wheel ATE disc brakes with four-piston caliper on front and two-piston caliper on the rear. All models use twin circuit, tandem piston master cylinders. Four wheel disc brake system use a pressure limiter to control hydraulic pressure applied to rear brakes. Hydraulic pressure to rear brakes is adjustable with the pressure limiter. Hand brake actuates cable to rear brake shoes. A special duo-servo drum-disc combination is used on rear wheels with disc brakes.
ADJUSTMENT
DRUM BRAKES 
2800 CS & CSA - Release handbrake, hoist vehicle and using suitable wrench (6038) loosen each brake shoe with its eccentric adjusting screw. While revolving wheel, turn left adjusting screw counterclockwise and right screw clockwise, until wheel will no longer turn. Loosen each screw ⅛ turn at a time until wheel turns freely.
DISC PADS
Front and rear disc brake assemblies are self-adjusting, therefore, no adjustment in service is required.
PARKING BRAKE
PISTON ALIGNMENT
Disc Brakes (With Integral Drum On Rear) - Release parking brake lever, raise and support vehicle and remove rear wheels. Insert brake adjusting tool through .6" hole in rotor. Turn start wheel adjuster until rotor can no longer be turned, then back off adjuster two or three teeth. Working inside driver compartment, tighten adjustment nut on hand lever until parking brake holds vehicle (before fifth ratchet stop is reached).
Models With Rear Drum Brakes - Drum brakes must be adjusted before attempting to adjust handbrake. Handbrake should be adjusted if hand operated lever can be pulled up more than five notches. Adjust with handbrake lever completely disengage, by turning adjuster on cable and next to hand brake lever. Adjustment is correct when handbrake will lock rear wheels without passing through more than four or five notches on ratchet.
HYDRAULIC SYSTEM BLEEDING
NOTE - Manufacturer recommends replacing brake fluid entire system once a year to avoid moisture build-up. Attach a pressure bleeder to master cylinder reservoir. CAUTION - Do not exceed 29 psi. Raise and support vehicle and remove wheels. Attach a bleeder hose to bleeder screw, and immerse opposite end of hose into a container partially filled with brake fluid. Open bleeder screw, allow all air has been expelled  from system. NOTE - On front wheel four piston calipers, bleed lower inboard screw before bleeding lower outboard screw.
REMOVAL AND INSTALLATION
DRUM BRAKE SHOES
Removal - Hoist vehicle, remove rear wheels and brake drums. Detach brake shoes from bottom support, then pull shoes out of wheel cylinders. Disconnect hand brake cable from rear shoes. Separate shoes by removing return springs.
Installation - Reverse removal procedure and note the following: Install long end of shoe push rod spring toward handbrake lever. Adjust brakes.
DISC PADS
Removal - Raise and support vehicle and remove wheels. Drive out retaining pins toward inside of vehicle and remove cross spring. Using a suitable extractor tool (3.9314-14002), remove disc pads from caliper assembly.
Installation - 1) NOTE -  Replacement of disc pads should be done in complete sets only. Using a cylinder brush, clean guide surface and support surface in caliper. Siphon sufficient fluid from outer cylinder reservoir to prevent overflowing, then press pistons to bottom of bores.
2) On rear two piston calipers, ensure machines position of piston face makes a 20° angle to lower caliper wall. Install disc pads, cross spring and retaining pins. After installation, depress brake pedal several times to position pads against rotor.
CALIPER ASSEMBLY
Removal - Remove master cylinder reservoir cap and plug fluid outlet lines. Raise and support vehicle and remove tire and wheel assembly. Disconnect hydraulic line(s), remove caliper mounting bolts, and separate caliper from caliper from backing plate.
Installation - Reverse removal procedure and bleed hydraulic system.
ROTOR
Removal & Installation (Front) - With caliper assembly removed, remove hub grease cap, cotter pin, and nut. Remove hub and rotor assembly. Remove Allen head bolts retaining rotor to hub and remove rotor. To install, reverse removal procedure, tighten all bolts and fittings evenly, and bleed hydraulic system if necessary. Adjust front wheel bearing. See Wheel Bearing Adjustment in WHEEL ALIGNMENT Section.
Removal & Installation (Rear) - Remove rear wheel and caliper assembly, then pull rotor out from axle shaft flange. To install, reverse removal procedure, tighten all bolts and fittings evenly, and bleed hydraulic system if necessary.
PARKING BRAKE SHOES
Removal - With rear caliper and rotor removed, disconnect lower return spring using brake spring pliers. Turn retaining springs 90 degrees using suitable tool (7014) and remove. Pull brake shoes apart at bottom and lift away upwards.
Installation - Reverse removal procedure and adjust parking brake shoes and cables.
MASTER CYLINDER
Removal - Remove master cylinder reservoir cap and plug fluid outlet lines. Remove hose fittings from master cylinder and raise above reservoir fluid level. Mark hydraulic lines for reassembly reference and disconnect from master cylinder. Remove nuts attaching cylinder to power unit, and separate master cylinder from power brake unit.
POWER UNIT PUSH ROD ADJUSTMENTS

Installation - Reverse removal procedure and note the following: Make sure rubber "O" ring seal between master cylinder and power unit is not damaged. Check clearance between power unit thrust rod and master cylinder piston with Plastigage and, if necessary, set to .020" by inserting a shim behind plunger head. Bleed hydraulic system and check for fluid leaks.
POWER BRAKE UNIT
Removal - 1) Remove air cleaner and battery, disconnect oil reservoir for power steering (if equipped) and move to one side. Block brake fluid reservoir outlets and remove hoses from master cylinder.
2) Remove lower left instrument panel housing and secure to one  side. Remove brake pedal clevis pin, and disconnect vacuum hose from intake manifold. Remove hydraulic lines from master cylinder marking positions for reassembly reference. Remove nuts retaining power unit to support and remove power unit.
Installation - Reverse removal procedure, bleed hydraulic system, and check following adjustments: Adjust length of piston rod (A) to 14.49-14.53". Adjust pedal height (B) to 9.65". Adjust exposed depth of brake light switch plunger (C) to .24-.28". See illustration.
Check Valve Replacement - Check valve is located in power unit vacuum line at intake manifold. To remove, loosen hose clamps, remove vacuum hoses, and remove valve. To install, reverse removal procedure, making sure arrow or block portion of valve faces intake manifold.
Filter Replacement - With power brake unit removed from vehicle, pull back rubber dust boot and remove retaining ring. Remove silencer and filter. To install, reverse removal procedure.
REAR BRAKE PRESSURE LIMITER
Removal & Installation - Plug fluid outlets in brake fluid reservoir. Disconnect brake hose and rear brake lines from pressure limiter. Remove mounting bolts and pressure limiter. To install, reverse removal procedure and bleed hydraulic system.
OVERHAUL
DRUM BRAKE WHEEL CYLINDER
Disassembly - With wheel brake drum removed, back off shoe adjusting cams, disconnect brake line and remove cylinder from backing plate. Disassemble wheel cylinder and pay particular attention to location and direction of parts.
Cleaning & Inspection - Clean all parts in alcohol or other suitable non oil base solvent. Discard all rubber parts and inspect all other parts for wear or damage.
Reassembly - Dip new parts in clean brake fluid or apply ATE cylinder paste. To install cylinder, reverse disassembly procedure and bleed brakes.
BRAKE CALIPER
Disassembly - With caliper removed from vehicle and disc pads remove from caliper, remove clamping rings and rubber protecting caps. Hold one piston in place using a suitable clamp, insert a piece of wood in caliper  cavity, then apply compressed air to fluid inlet and remove opposite piston. Remove sealing ring using a suitable plastic tool. Remove remaining piston(s) and seal(s) in same manner. NOTE - DO NOT separate caliper halves unless a leak is detected. To disassemble, remove expansion bolts, separate caliper halves and remove sealing rings.
Cleaning & Inspection - Clean all parts in alcohol and check for wear or damage; replace parts as necessary.
Reassembly - Reassemble caliper (if separated) using new seals and expansion bolts. Tighten expansion bolts from inside out. Coat pistons and caliper bores with ATE brake cylinder paste (or equivalent), install sealing rings, then install pistons into bores. Make sure pistons are not tilted when inserting. On two pison calipers, make sure machined surface of piston face makes a 20 degree angle to lower caliper wall. Install rubber protecting caps and clamp rings.
MASTER CYLINDER
Disassembly - Push in on primary piston and remove secondary piston stop screw. Remove snap ring from end of cylinder and remove primary and secondary piston assemblies and return spring. Disassemble piston assemblies noting number of parts used.
Cleaning & Inspection - Clean all parts in alcohol and inspect for wear or damage. NOTE - Cylinders with surface defects in bores must be replaced; do not overhaul.
Reassembly - Reassemble piston assemblies using a thin coating of ATE brake cylinder paste (or equivalent). Install piston assemblies into cylinder bore using a suitable guide sleeve (BMW 6063) to prevent damaging seals. Install secondary piston stop screw, making sure that piston is pushed fully forward before screw is installed and tightened. Install retaining ring in end of master cylinder bore.

Read More..

1970 73 Capri All Models Wheel Alignment

| 0 comments |
1970-73 CAPRI SPECIFICATIONS AND ADJUSTMENTS

TIRE INFLATION (COLD)
Before attempting to check or adjust wheel alignment, ensure that tires are properly inflated. Refer to manufacturers specifications located on right hand sun visor.

CASTER
All Models - Caster is nonadjustable. If not within specifications, check front suspension for damage. Repair or replace parts as necessary.

CAMBER
All Models - Camber is non adjustable. If not within specifications, check front suspension for damage. Repair or replace parts as necessary

TOE-IN
All Models - Position wheels in straight ahead position and loosen tie rod end lock nut and clips securing bellows. To adjust toe-in, rotate tie rods until specifications are within limits. Tighten lock nuts and secure clips. Tie rods should be equal within 1/4".


Read More..